In retrospect, a wort chiller offered the best return on investment. The way I brew is about once a month, but back-to-back-to-back brews. Yes, a triple brew day. My reasoning is that equipment only has to be cleaned once for all three brews. I am there, everything is ready. But brewing back to back the effectiveness of your wort chiller will determine how long your brew day is.
I do simple, one step infusion mashes for one hour before mashout and sparge. I need the boil kettle for sparging so the first batch NEEDS to be pumped out of the boil kettle during late mashing of the 2nd (or 3rd) batch so the sparge water is at 170.
Immersion Chillers
I used a copper immersion coil nearly a decade ago when I was doing stovetop batches. At that scale since you are usually only doing one 5-gallon batch, it is simple, cheap and effective albeit a little clumsy and not-too-elegant.

Counterflow Stainless Steel External Chiller
I made this one for our current 1/2 barrel brewery. It is 1/2 inch outer diameter stainless steel at about 28 feet long. Stainless is nice as it’s the perfect food-grade metal. vs copper. What I found out after brewing for half a year is that it just isn’t the best heat exchanger for back-to-back brews. I averaged 30 minutes pumpout for 10 gallons. City water in the summer/fall reached 66-68 degrees which took even longer. The winters are better as the city water gets into the high 40’s. But still. On an already long brewday, it can add 60-90 minutes to your day.

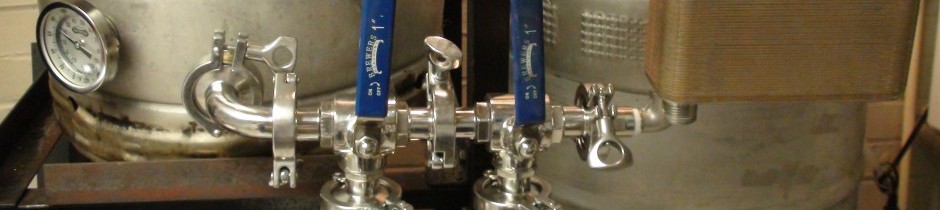
Stainless Steel Counterflow Chiller
Using the Counter Current Wort Chiller
Below is a picture of the chiller setup inline with my boil kettle (top right). The wort would go out the boil kettle, across the top horizontal pipes and directly to the chiller. I do not use the vertical pipes. This is gravity drained. Due to the (in)efficiency of the counter current chiller, the only way to do this is by gravity so that you can cool it down to a reasonable temperature. Even if your cooling water is in the high 40’s, you still can’t pump wort through it as you would have to really throttle the pump back.

The Therminator (plate chiller)
I was skeptical at first. I assumed it would plug up a lot and be too flow restrictive. Not the case at all. I am achieving 7 minute pumpouts for 12 gallons with 57 degree city water to 69 degrees. From tests when I first received it I was able to pumpout 10 gallons of boiling wort in 10 minutes with 72 degree city water (summer months) with wort cooled to 74 degrees. These were both with about 4 gallons per minute city water through the chiller. I am using the pump to achieve these wort flowrates.
I have added a trub filter between the boil kettle and the Therminator to ensure that a lot of junk doesn’t collect in it.
Cleaning the Therminator
On triple brew days, I soak it (the whole thing) in iodine solution (1oz/5 gallons) before use then giving it a quick filtered water rinse. Between batches I reverse flush it with clean water and let it soak in the iodine solution until it’s needed later for the next batch. After I am all done I then clean it with PBW solution @ 160 degrees recirculating for awhile. I usually do this the next day while keg cleaning at the same time to save on cleaner and just overall efficiency.
Well worth the $200. Best investment ever.

Therminator
Using the Therminator
Below is the Therminator in action. The wort from the top, left boil kettle goes through the large, cylindrical trub filter, then to the pump, which gets pumped back up to the Therminator and out to the fermentor. In this configuration, I have found that you have to ‘burp’ the trub filter first. So when the boil is done, immediately open up the valves to the chiller, but do not turn on the pump. This will allow air to escape from the trub filter through the boil kettle. After 15 minutes, the burping is done, the trub has settled in the boil kettle and you can turn your pump on for pumpout.

Using the Therminator

On the compact 3 tier the wort,is gravity fed from kettle to fermentor, right? Do u run it thru chiller using only gravity then?
On the compact 3 tier, yes, you can gravity feed from kettle to fermentor through the countercurrent chiller. Though it may take 30-45 minutes depending on your water temperature, but no, it’s not a problem (don’t use a trub filter for this).
I haven’t tried gravity flow with the Therminator yet. I wouldn’t want to since I added the trub filter and it needs a pump.
From your link, I read that the trub filter was not supposed to be up-stream of the pump. Is there a reason you decided not to go that route? Do you think this may cause the need to burp it first?
I did not put the trub-filter on the other side (outlet side) of the pump as, since I don’t like to disassemble the pumbing much, every other process that I do (even on non-brew days) would have to go though it. So putting the trub filter on the inlet side restricts that line of pipe to only pumping out the kettle…and yes, that means I have to burp it, then whirlpool it when done, then let it sit for about 15 minutes. The 3 way valves that are on the system really gives you flexibility to move water, wort or cleaning solution any which way to any kettle.
With the trub filter on the suction side of the pump, it does need burped. It takes about 5-10 minutes after the boil is done…then whirlpool and let it sit another 15 minutes. I did not put it on the output side as working with my fittings, the plumbing was more versatile. If the trub filter was on the output side, it just would need disconnected, reconnected everytime.
Hi,
Instalation beautiful ! can you tell me what size pipe you work? (valves – tees – sight glasses – extension tubes …) Thanks 🙂
It was 1.5″ SS piping with triclover connections.